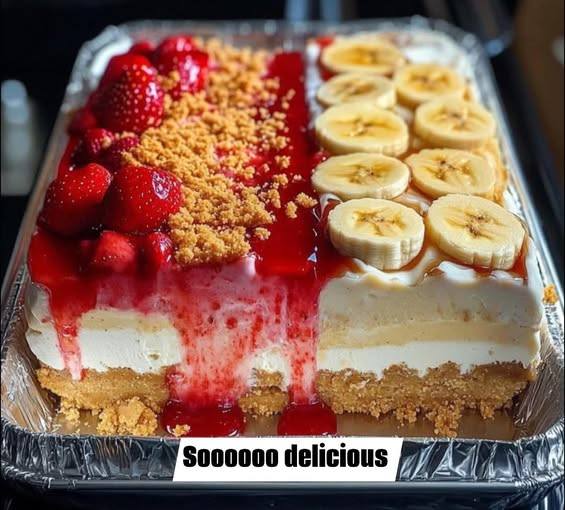
Both Strawberry Crunch Cheesecake and Banana Pudding Cheesecake are incredible dessert options that combine classic cheesecake with other popular flavors! They’re rich, creamy, and absolutely delicious. Here’s how to make both of them:
Strawberry Crunch Cheesecake
This cheesecake has a creamy, smooth texture with a crunchy, strawberry-flavored topping that gives it a fun twist. It’s a perfect dessert for anyone who loves the combination of strawberries and cheesecake!
Ingredients:
For the Cheesecake:
- 1 1/2 lbs cream cheese (softened)
- 1 cup granulated sugar
- 3 large eggs
- 1 tsp vanilla extract
- 1/4 cup sour cream
- 1/4 cup heavy cream
- 1/2 cup strawberry puree (fresh or frozen strawberries blended and strained)
- 1/4 tsp salt
For the Crust:
- 1 1/2 cups graham cracker crumbs
- 1/4 cup melted butter
- 2 tbsp sugar
For the Strawberry Crunch Topping:
- 1 box (about 8 oz) strawberry-flavored Jell-O (instant)
- 1 1/2 cups Golden Oreos (or regular Oreos)
- 1/2 cup unsalted butter (melted)
- 1/2 cup granulated sugar
Instructions:
1. Prepare the crust:
- Preheat your oven to 325°F (163°C).
- In a bowl, mix together the graham cracker crumbs, sugar, and melted butter until well combined.
- Press the mixture into the bottom of a 9-inch springform pan, creating an even layer.
- Bake for 8-10 minutes, then remove from the oven and set aside to cool.
2. Make the cheesecake filling:
- In a large bowl, beat the softened cream cheese with a hand mixer or stand mixer until smooth and creamy.
- Add sugar and continue to beat until combined.
- Add eggs one at a time, mixing well after each addition.
- Mix in the vanilla extract, sour cream, heavy cream, strawberry puree, and salt. Beat until smooth and creamy.
- Pour the cheesecake mixture onto the cooled crust in the springform pan.
3. Bake the cheesecake:
- Bake the cheesecake at 325°F (163°C) for 50-60 minutes, or until the center is just set and slightly jiggles when you tap the pan.
- Turn off the oven and leave the cheesecake in the oven with the door cracked for 1 hour.
- After the hour, remove it from the oven and let it cool completely before refrigerating for at least 4 hours (overnight is best).
4. Make the strawberry crunch topping:
- In a food processor, blend the Golden Oreos until finely crushed.
- Add the strawberry Jell-O powder, sugar, and melted butter. Pulse until everything is well combined.
- Once the cheesecake is fully chilled, spread the strawberry crunch topping evenly over the top of the cheesecake.
5. Serve:
- Slice and serve! The strawberry crunch topping will add a great texture contrast to the smooth, creamy cheesecake.
Banana Pudding Cheesecake
This dessert combines the flavors of a classic banana pudding with the rich, creamy texture of cheesecake. It’s a perfect fusion of two beloved desserts!
Ingredients:
For the Cheesecake:
- 1 1/2 lbs cream cheese (softened)
- 1 cup granulated sugar
- 3 large eggs
- 1 tsp vanilla extract
- 1/4 cup sour cream
- 1/4 cup heavy cream
- 1/2 cup banana pudding (store-bought or homemade)
- 1/2 tsp banana extract (optional, for extra banana flavor)
- 1/4 tsp salt
For the Crust:
- 1 1/2 cups Nilla wafer crumbs (crushed Nilla wafers)
- 1/4 cup melted butter
- 2 tbsp sugar
For the Topping:
- 2-3 ripe bananas, sliced
- 1/2 cup heavy cream (for whipped cream)
- 1 tbsp powdered sugar
- Extra Nilla wafers for garnish
Instructions:
1. Prepare the crust:
- Preheat your oven to 325°F (163°C).
- In a bowl, mix the crushed Nilla wafers, sugar, and melted butter until combined.
- Press the mixture into the bottom of a 9-inch springform pan.
- Bake for 8-10 minutes and then set aside to cool.
2. Make the cheesecake filling:
- Beat the softened cream cheese with a hand mixer or stand mixer until smooth.
- Add sugar and mix until smooth.
- Add the eggs one at a time, mixing well after each addition.
- Mix in the vanilla extract, sour cream, heavy cream, banana pudding, banana extract (optional), and salt. Mix until smooth.
- Pour the cheesecake mixture over the cooled crust.
3. Bake the cheesecake:
- Bake the cheesecake at 325°F (163°C) for 50-60 minutes, or until the center is set but still slightly jiggly.
- Turn off the oven and leave the cheesecake in the oven with the door cracked for 1 hour.
- After 1 hour, remove the cheesecake from the oven and let it cool completely.
- Refrigerate for at least 4 hours, or overnight for best results.
4. Prepare the whipped cream topping:
- In a chilled bowl, beat the heavy cream and powdered sugar until stiff peaks form (whipped cream).
- Once the cheesecake has chilled, spread the whipped cream evenly on top of the cheesecake.
- Decorate with sliced bananas and crushed Nilla wafers on top.
5. Serve:
- Slice and serve! The banana pudding flavor combined with the creamy cheesecake is a winning combination.
Tips for Both Cakes:
- Chill Time: Both cheesecakes need time to chill in the fridge (at least 4 hours or overnight). This helps them set properly and enhances the flavors.
- Banana Pudding Tip: If using homemade banana pudding, make sure it’s cooled completely before mixing it into the cheesecake batter.
- Storage: Store leftovers in the fridge. The banana slices may brown a little over time, so it’s best to top them just before serving.
Both of these cheesecakes bring a unique twist to traditional desserts. Whether you’re a strawberry or banana fan, these desserts are sure to impress anyone with their rich flavors and creamy textures! Which one are you most excited to try?
